Remote IoT Edge Development in Azure VMs & Template Images
Remote IoT Edge Development in Azure VMs & Template Images
Developing Azure IoT Edge modules can take a bit of careful configuration. To standardize on our development environments, we can set up remote VMs and leverage the VS Code Remote SSH extension allowing us to edit and debug from our host environment while keeping our dev environment clean. This also allows us to develop modules for foreign platforms and architectures.
We can also generalize the VM and create an image template from which we can generate new VMs in the future.
Setup Prerequisites
- SSH
- VS Code
SSH on Linux & MacOS
This should be installed already
SSH on Windows
In an admin PowerShell console:
Add-WindowsCapability -Online -Name OpenSSH.Client~~~~0.0.1.0
Close the Window. Next time you open a window, you should have SSH available on the command line.
Create SSH Public Key
ssh-keygen -t rsa -b 4096 -C "your_email@example.com"
# Once done, you’ll need your ssh public key for the VM
cat C:\Users\<your_user>\.ssh\id_rsa.pub
Create an Azure Virtual Machine
In the Azure portal, Create a virtual machine:
- Use a simple name in all lower case
- Choose a location near you such as the
North Europeregiona - Choose
Ubuntu Server 18.04 LTSfor your image Standard D2s V3should do for now.- Authentication Type:
SSH Public Key - Use a familiar user name such as your AD account
- Paste the public key from the above console session
- The rest of the defaults will work for now. Click
Review + create
Connect to the VM
From the Virtual machine Overview page:
- Click
Connect - Choose the SSH tab
- Copy the ssh credentials
- Open a command prompt and verify that you have ssh available
- Paste the connection details from the portal, for example:
ssh my_user@192.168.1.206 - You will be prompted regarding the thumbprint and entering your passphrase.
Configuring the VM
# Install Docker
sudo apt update
sudo apt install -y docker.io

# Configure Docker
sudo usermod -aG docker $USER
sudo reboot

# Install .NET Core and its dependencies
sudo apt-get install -y apt-transport-https
wget -q https://packages.microsoft.com/config/ubuntu/18.04/packages-microsoft-prod.deb -O packages-microsoft-prod.deb
sudo dpkg -i packages-microsoft-prod.deb
rm packages-microsoft-prod.deb
sudo apt update
sudo apt-get install -y dotnet-sdk-3.1

# Install docker-compose and its dependencies
sudo apt install -y curl
sudo curl -L "https://github.com/docker/compose/releases/download/1.29.2/docker-compose-$(uname -s)-$(uname -m)" -o /usr/local/bin/docker-compose

# Install IoT Edge Hub Dev Simulator and its dependencies
sudo apt install -y python3-pip
python3 -m pip install --upgrade pip
sudo -H python3 -m pip install --upgrade pip
sudo -H python3 -m pip install --ignore-installed PyYAML
sudo -H python3 -m pip install --upgrade iotedgehubdev
Configuring VS Code
Connect With VS Code
- Install the
Remote – SSH extension - Use
Ctrl+Shift+P,Remote SSH : Add New SSH Host… - Enter your ssh information from the azure portal:
ssh my_user@192.168.1.206, then select your user ssh config folder - Use
Ctrl+Shift+P,Remote SSH : Connect To Host…, then select your host. - A new copy of VS Code will open. Enter your passphrase. You’ll see the lower left corner of the editor show green and SSH:
<your host>
Installing Extensions
- Click Extensions. You’ll see the list of local and remote installed extensions. Go through your installed extensions and install them in the remote VM via the green install buttons. Install:
- Azure IoT Edge
- C#
- Docker
- Once all are installed, click the
[reload required]button. This will restart VS Code. Enter your passphrase again.Ctrl+Shift+P=>Azure IoT Edge: New IoT Edge Solution- Select home folder
- Name: testsolution
- C# Module
- Name: testmodule
- localhost:5000/testmodule
This will create a sample edge solution. Once the dotnet restore is finished, VS Code will reload with the workspace selected, enter your SSH passphrase. This is just an example. You can also clone an existing repository and open that folder in VS Code. This is just a full example for demonstration purposes.
Getting Started
With the extensions installed on the remote VM, we can use the IoT Hub Extension to connect to our IoT Hub:

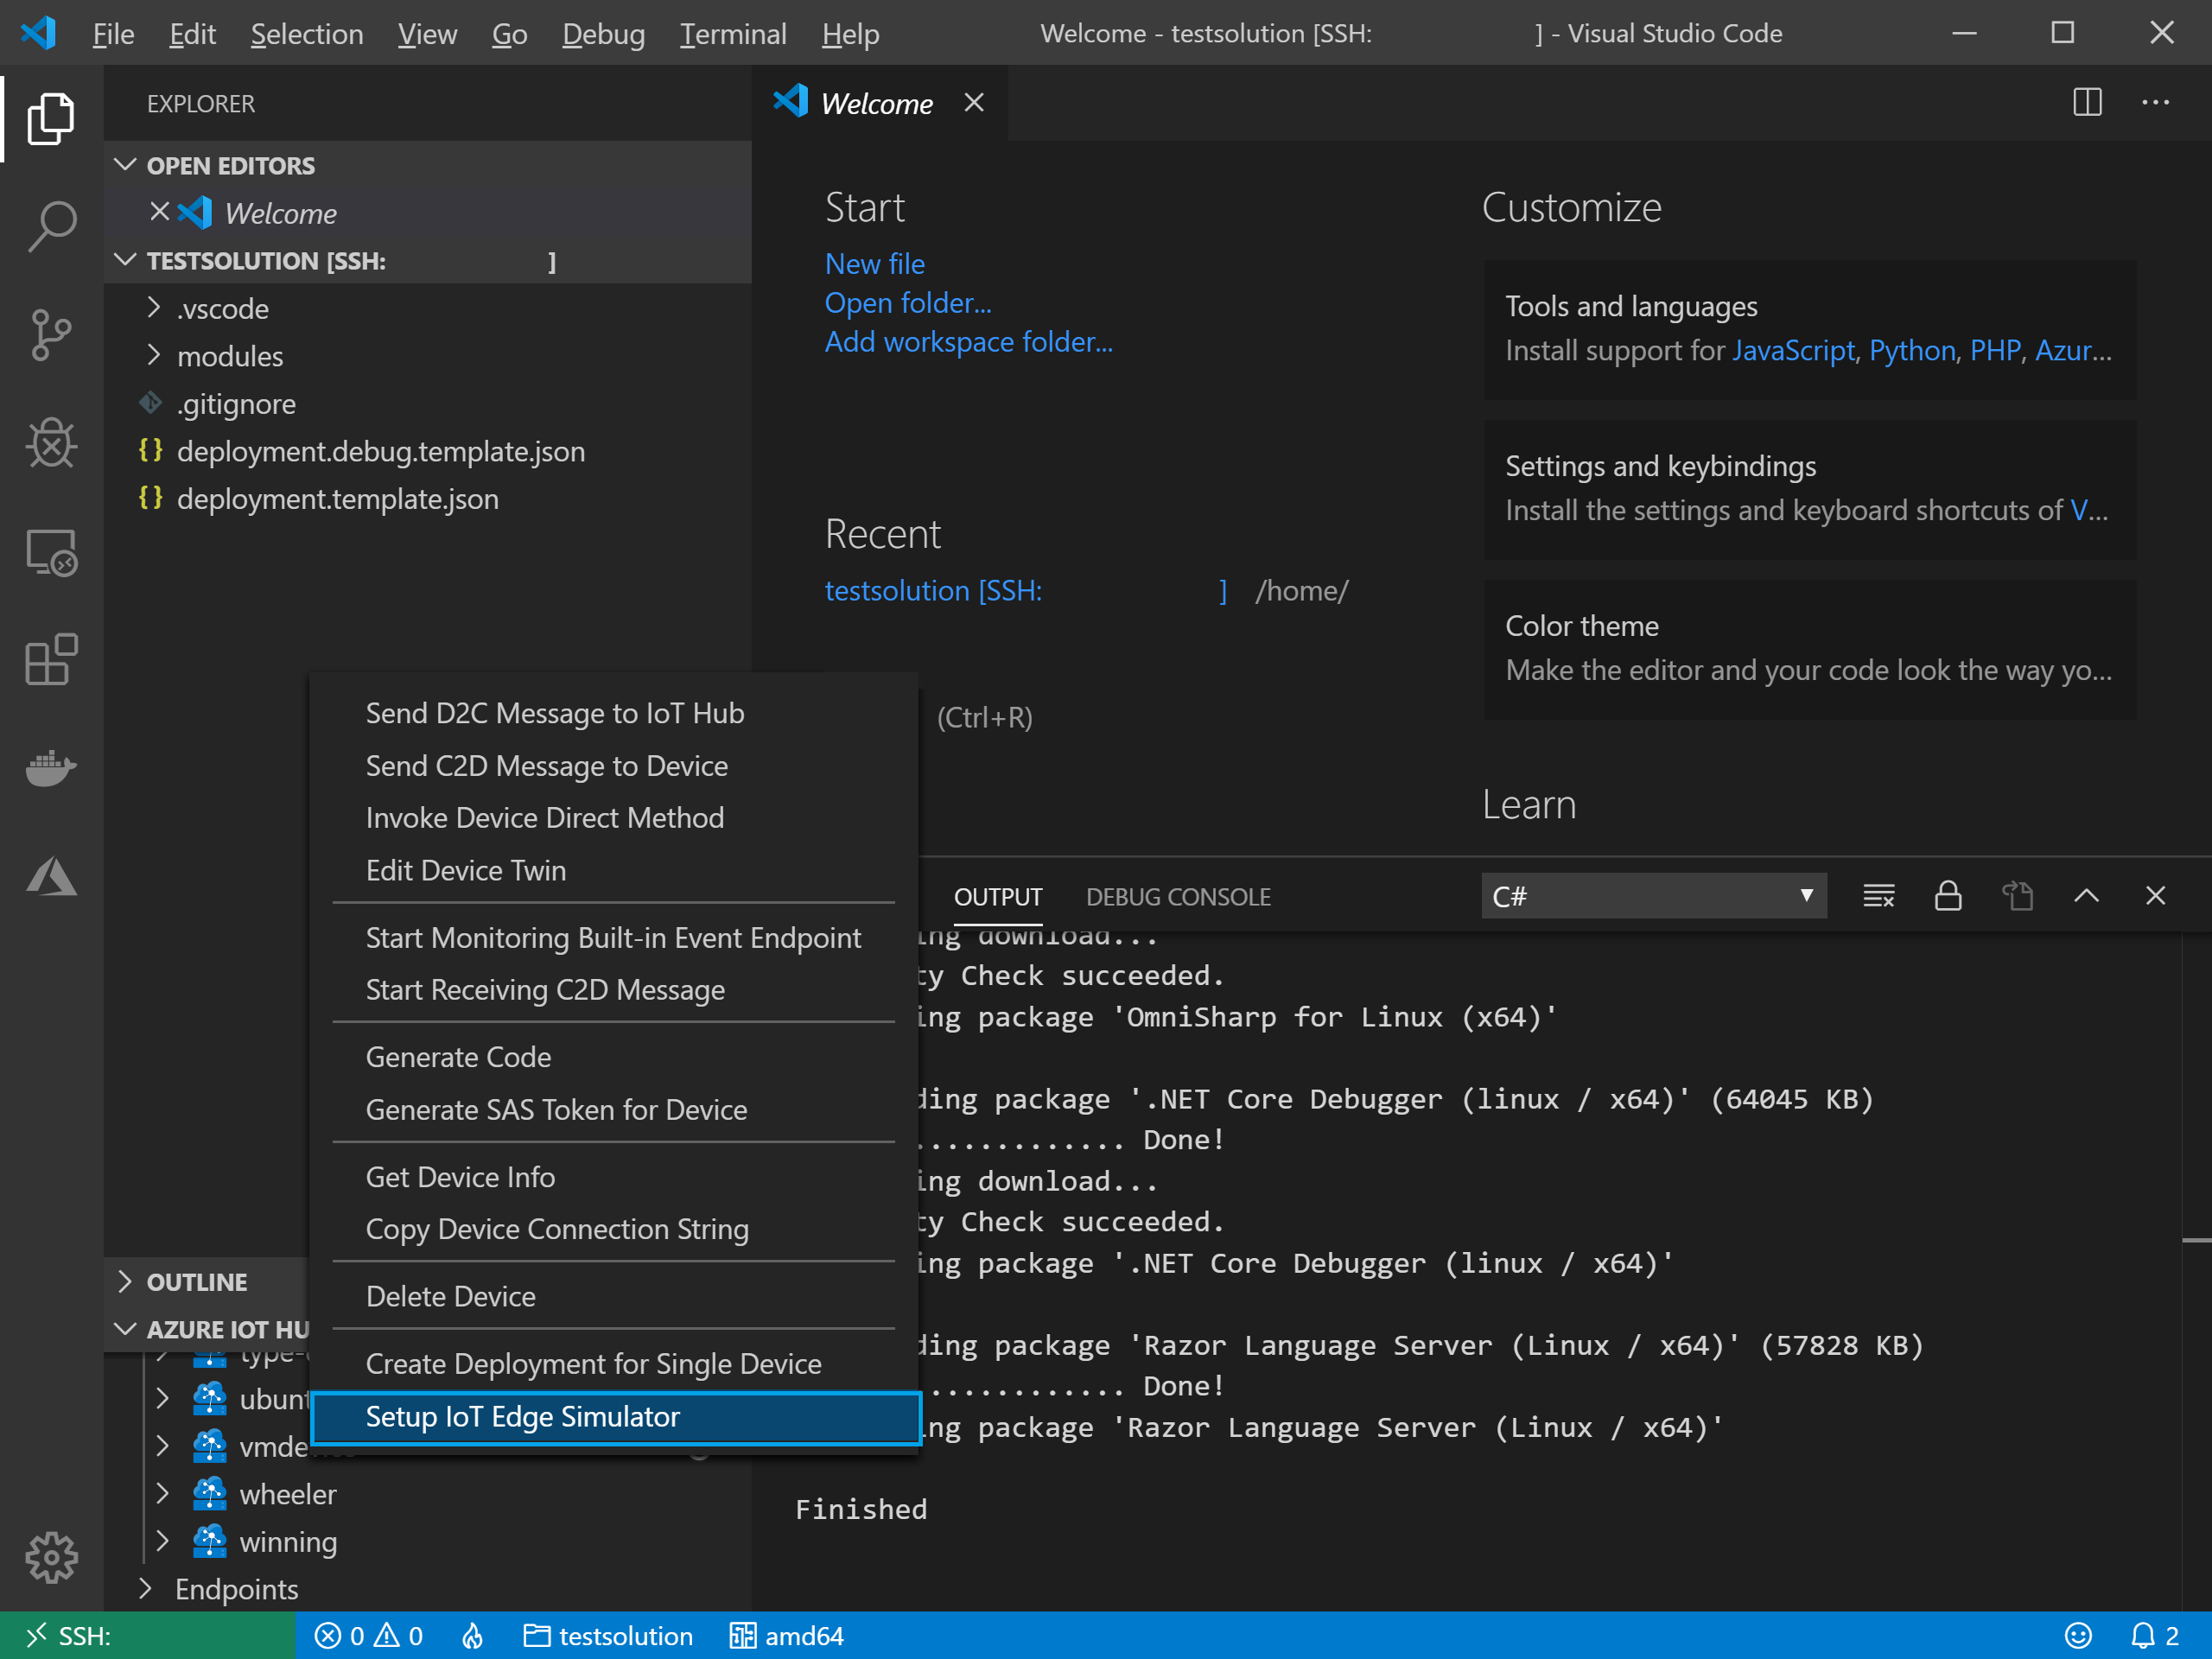
With our IoT Hub Connection made, we can select our device and configure the remote VM’s simulator for that device:
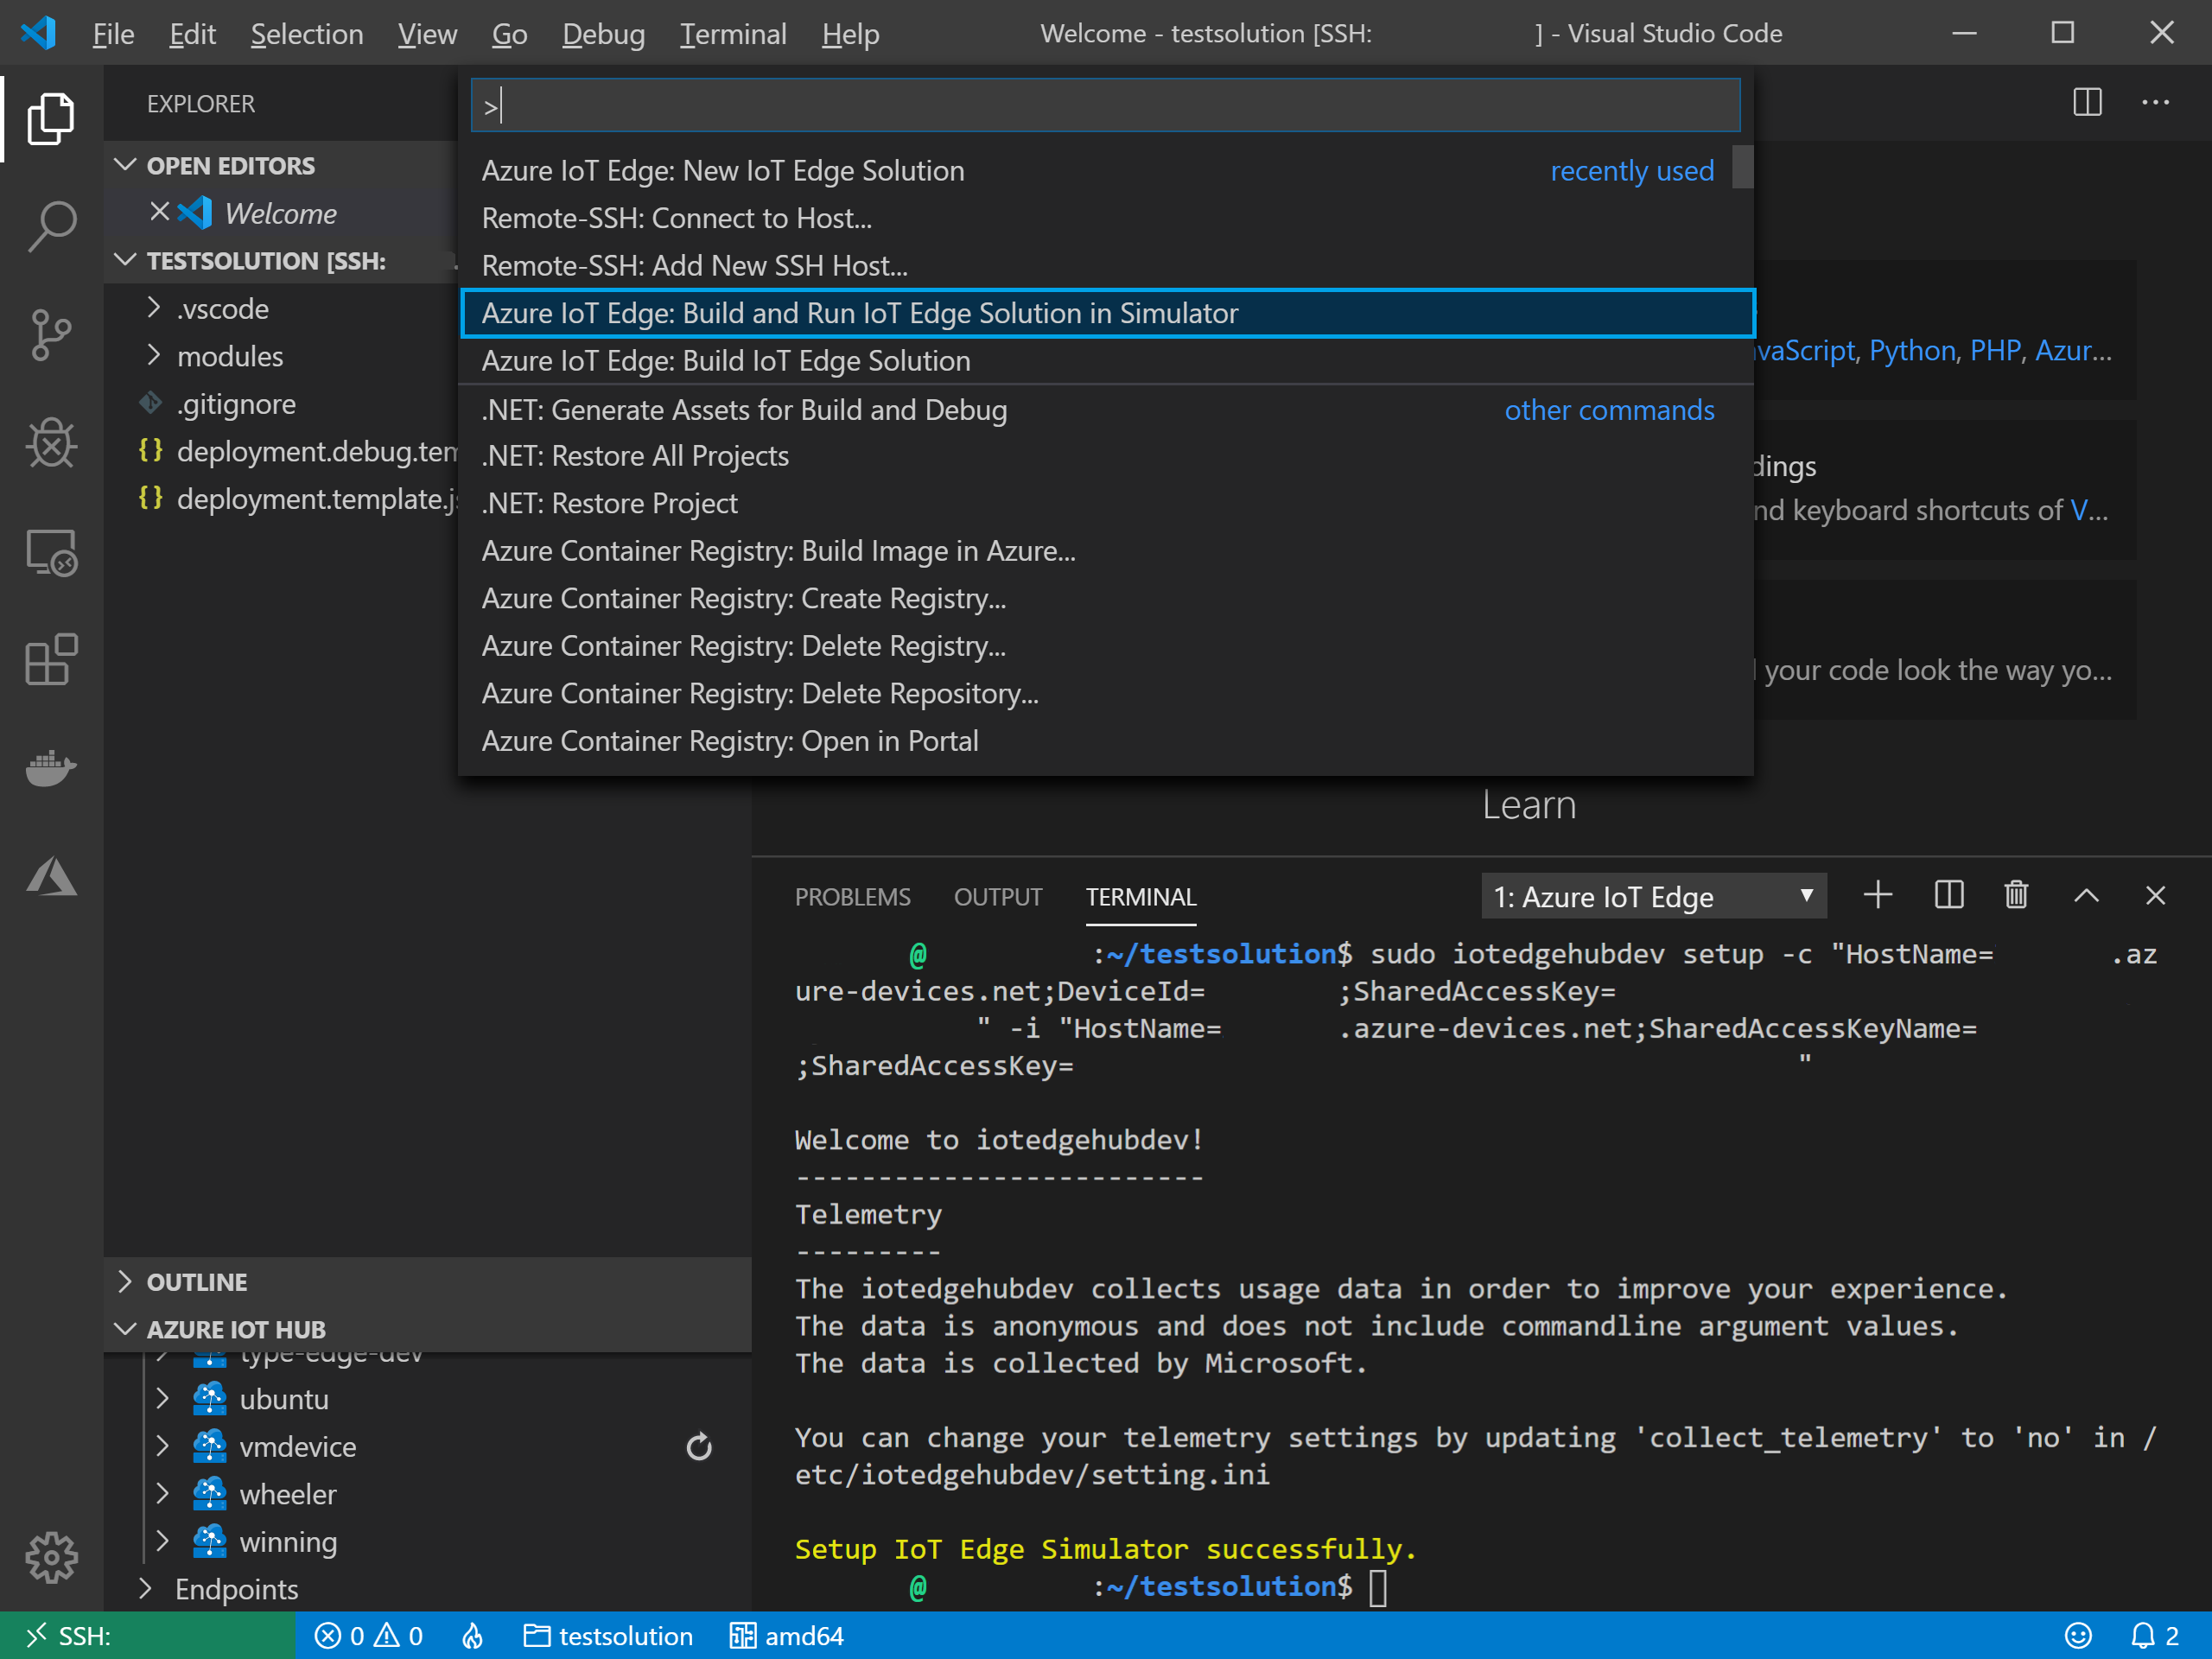
We can now run our application with the simulator in the remote VM. Ctrl+Shift+P => Azure IoT Edge: Build and Run IoT Edge Solution in Simulator. Choose the debug template so we can have symbols available and attach to the remote container:
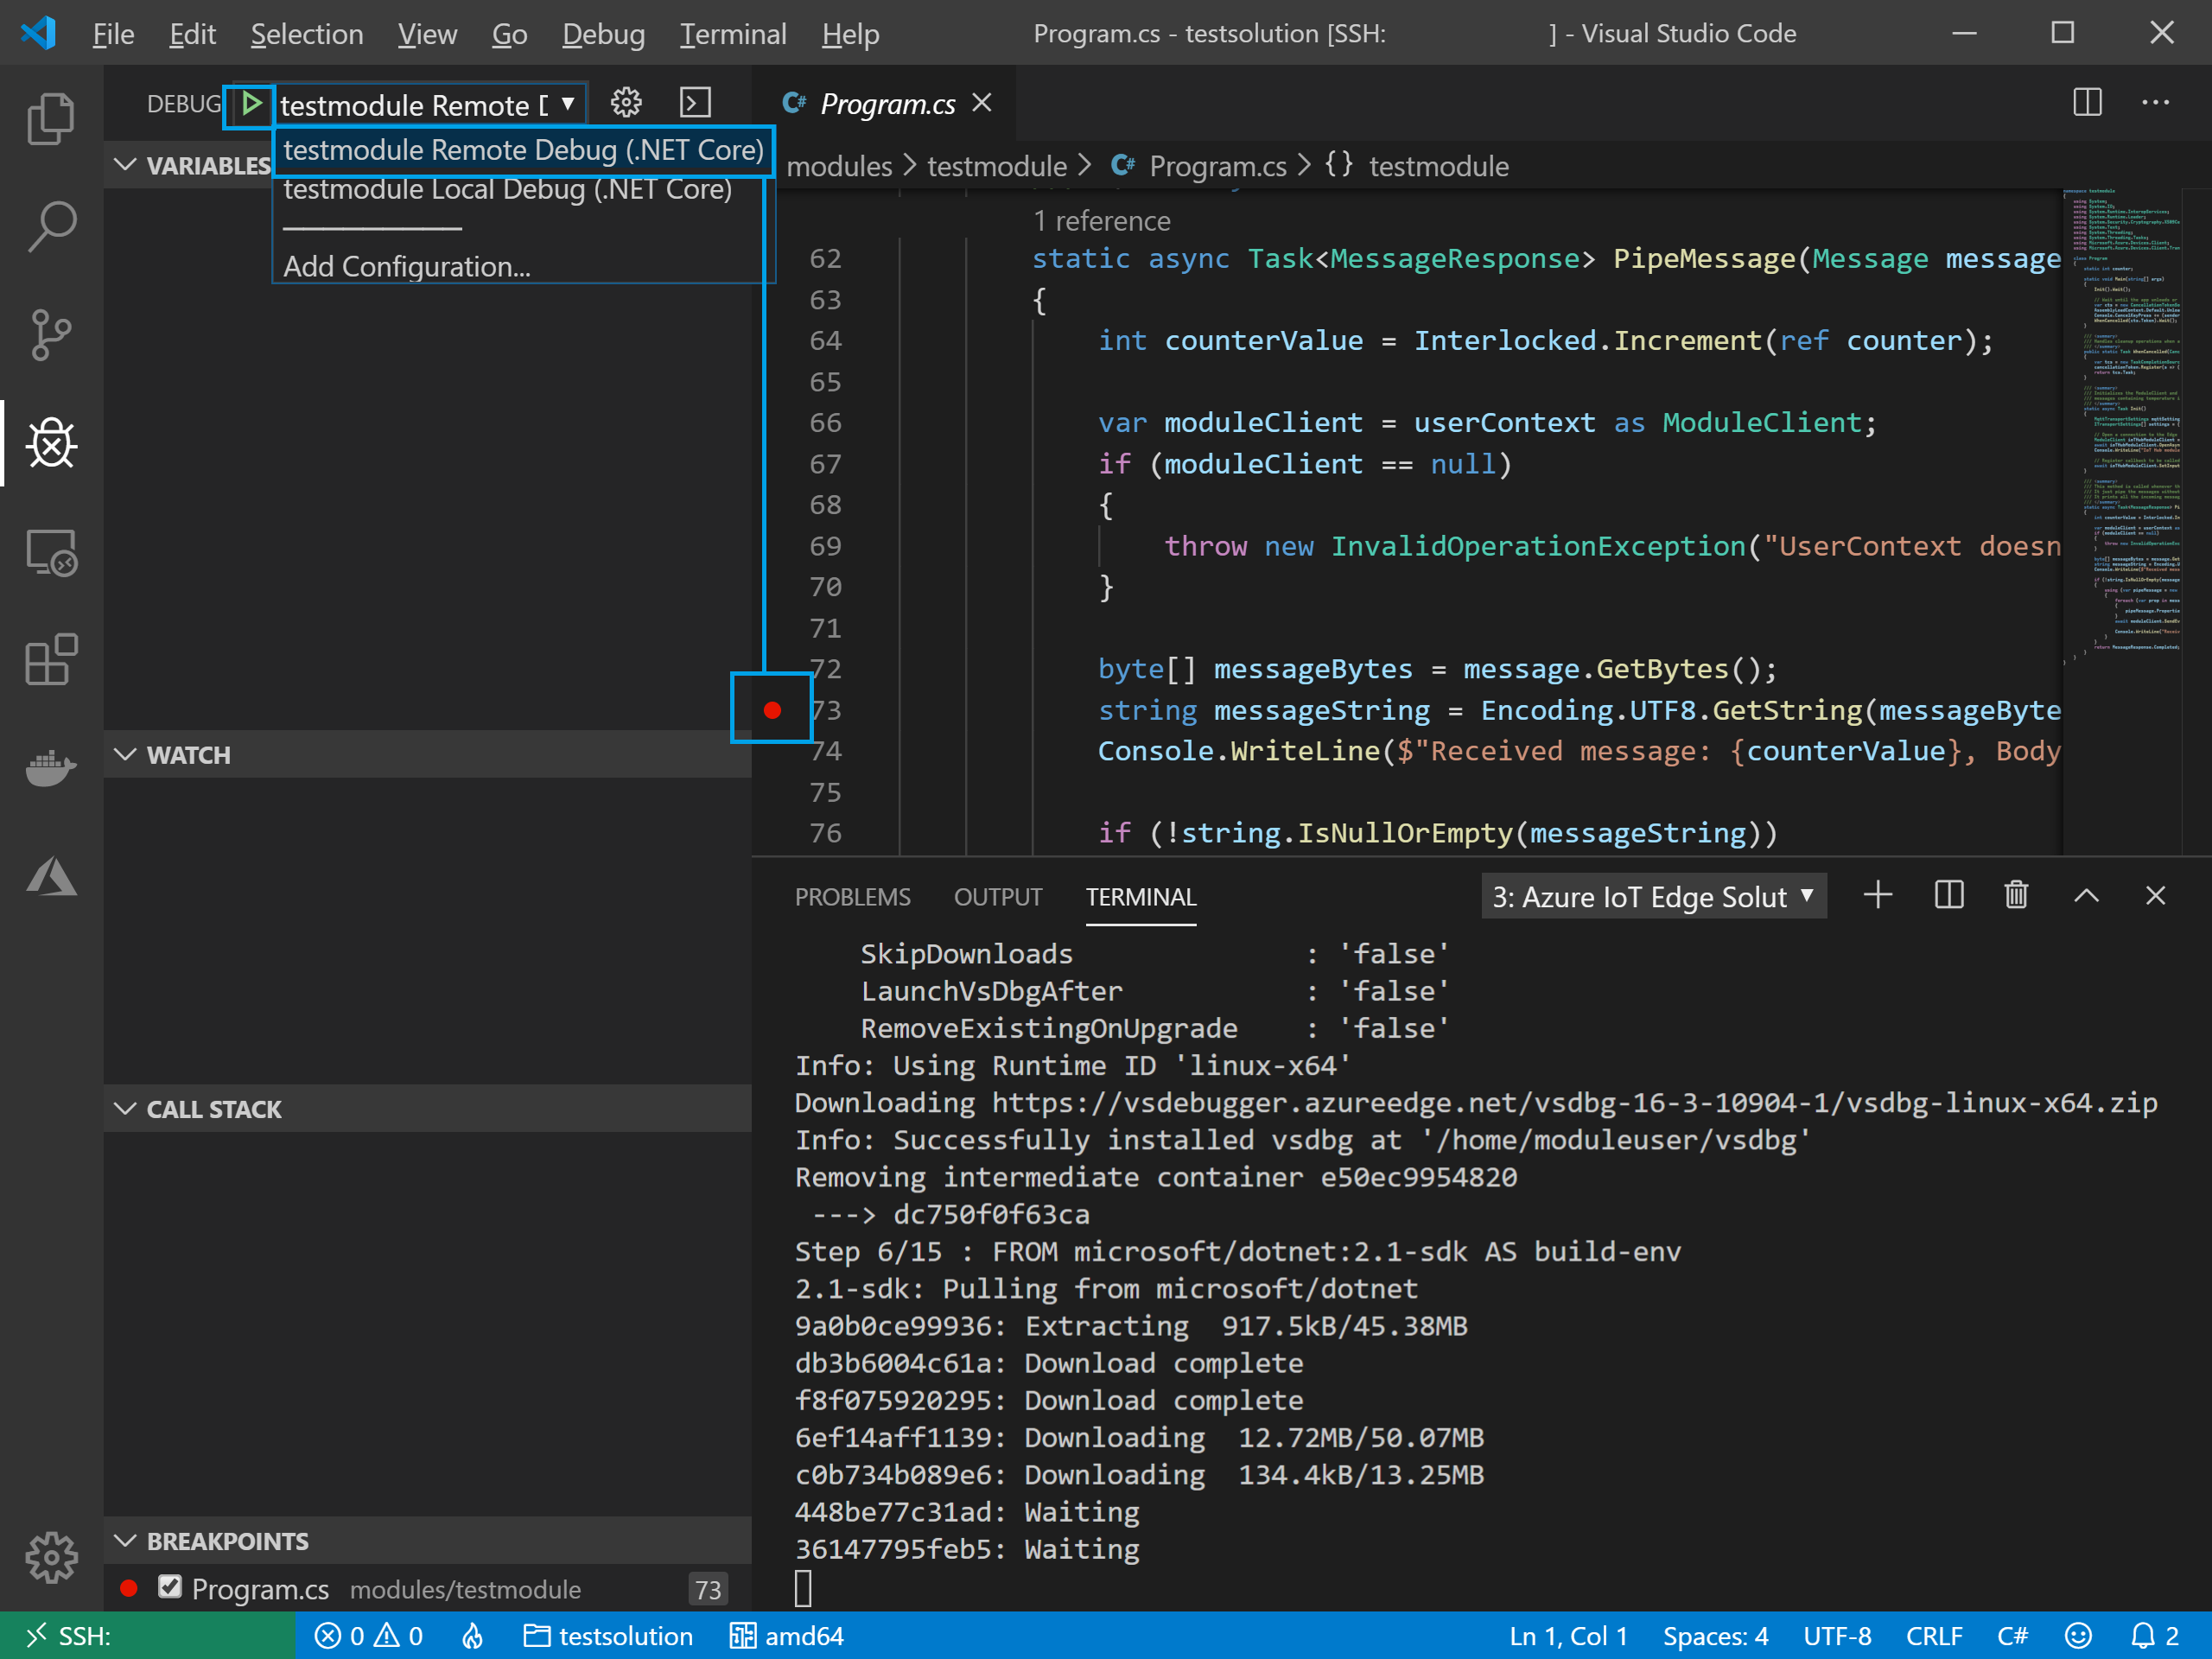
Since we chose the debug template, we can select the debug icon on the left hand side and choose to debug a remote module. Make sure to set a breakpoint in the PipeMessage method in the testmodule so you can see the breakpoint hit when the simulated temperature sensor relays telemetry.
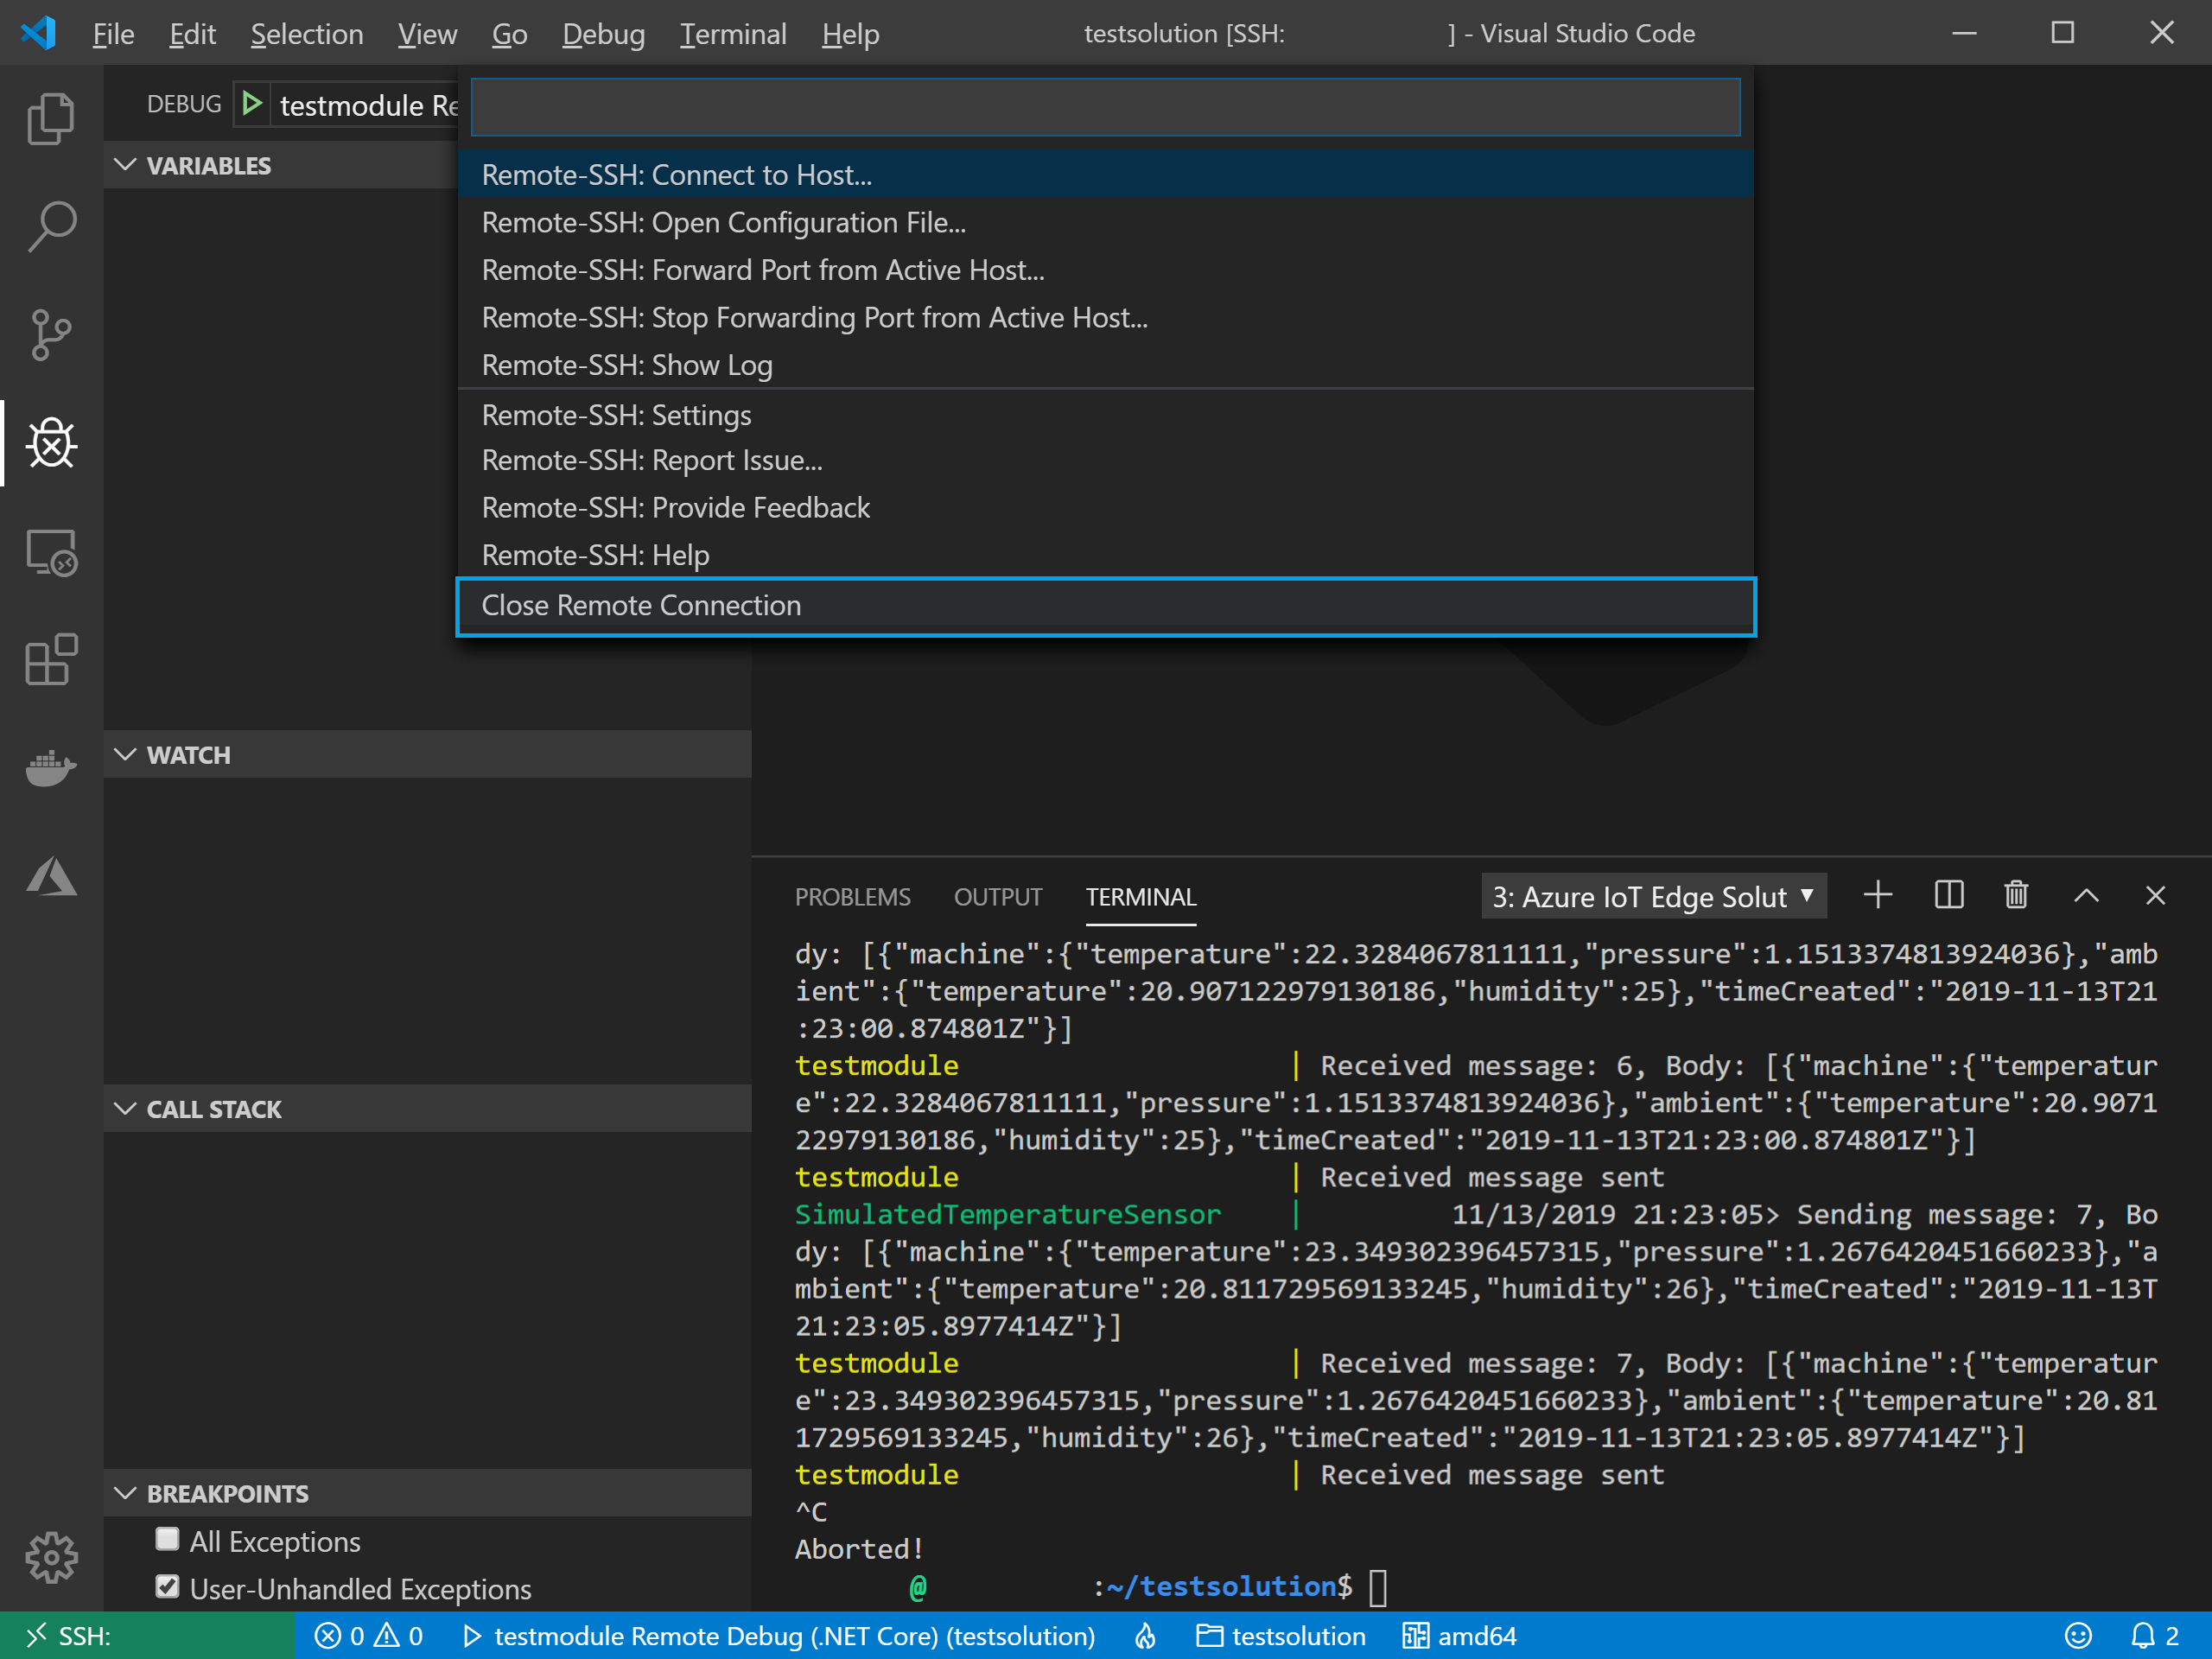
Once you are done, click the SSH connection in the bottom left corner, then disconnect the session.
Creating a VM Template
If you would like to make a template from which other VMs can be created, you can follow these steps.
Install Azure CLI
Follow the latest Azure CLI installation instructions for your platform
Turn VM Into an Image
warning Make sure you are done with your VM as it will not be usable after this.
note This is for linux VMs only
The following is a summary of instructions from Azure VM Capture Image. Please read the documentation for detailed explanations.
In your SSH session on the VM:
sudo waagent -deprovision+user
enter y [Enter]
exit
On your machine
az login
az account set --subscription <your subscription name>
az vm deallocate --resource-group <rg-name> --name myvmname
az vm generalize --resource-group <rg-name> --name myvmname
# The documentation omits --location, but you need it or you'll get an error
az image create --resource-group <rg-name> --name iotdevvm-template --source myvmname --location northeurope

az vm create --resource-group <rg-name> \
             --name iotedevinstance \
             --image iotdevvm-template \
             --admin-username <user name> \
             --ssh-key-values ~/.ssh/id_rsa.pub \
             --location northeurope
Once you’ve created the image from your template image, you’ll need to add your new user the docker group again as the user setup before the imaging has been purged
sudo usermod -aG docker $USER
If you forget to do this, you’ll get permission errors while running remote docker commands.
Additional Notes
You will likely want to Start/Stop VMs during off-hours solution in Azure Automation to save money while you aren’t working on the VM.
You can configure a DNS name for your VM in the VM IP settings so that you can address your VM in a better way than IP such as myiotedgedev.northeurope.cloudapp.azure.com.
When creating the VM template, you’ll likely want to configure /etc/skel to configure the environment when new VM instances are created from the template.
Because your dev environment is running in Azure, you get amazing upload and download rates for everything, especially pull/publishing container images.